PhotoSpin User’s Manual 2: HUD
PhotoSpin Version 2.0
Ananke Media Systems
September 2010
Introduction
The HUD User’s Manual provides detailed instructions for operating the PhotoSpin HUD. Before using the HUD, please study the Setup and Menus User’s Manual first.
Rest assured that the HUD is quite easy to use. With the HUD Quick Start guide, it takes only a few minutes to set up your HUD and start using it to run PhotoSpin. If you need to learn more about how certain features on the HUD work, simply consult the relevant sections below.
To jump to specific sections of the HUD User’s Manual, please click on the following links:
- HUD Quick Start
- Setting Up the HUD
- Using the HUD
- Backdrop
- Backdrop: Texture/Appearance
- Backdrop: Colour
- Backdrop: Rotate
- Backdrop: Resize
- Tools
- Tools: Lights
- Tools: Effects
- Tools: Gazers
- Tools: Position
- Tools: Colour
HUD Quick Start
- Left-click Control Sphere for Main menu.
- Select Options >> Get HUD.
- Locate PhotoSpin HUD in your inventory.
- Right-click and select wear.
- Left-click Backdrop or Tools to access controls.
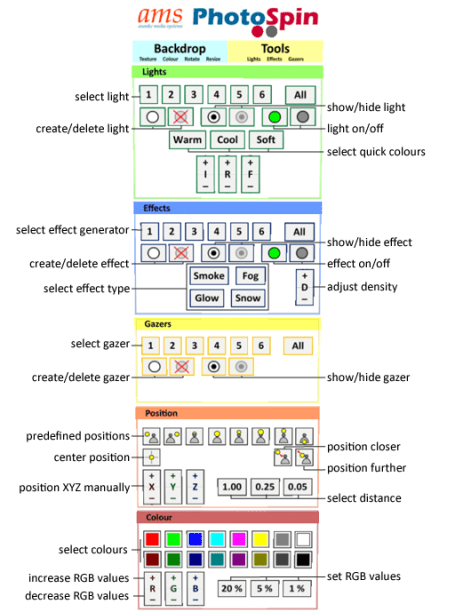
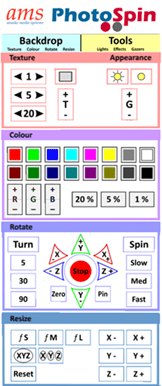
The following two diagrams provide quick guides to most of the HUD controls for the Backdrop and Tools. For full instructions, see below.
Backdrop
Tools
Setting Up the HUD
You can operate PhotoSpin using menus, the enclosed HUD, or the Chat Interface. You can also combine all three, using one or the other according to your preferences. Follow these steps to set up the HUD:
-
Make sure the PhotoSpin Backdrop and Control Sphere are correctly rezzed inworld before attempting to use the HUD. The HUD communicates all commands via the Control Sphere. It is not a stand-alone device.
-
Locate the PhotoSpin HUD in your inventory. This should be in the same folder as the Backdrop and the Control Sphere. You can also use Options >> Get HUD to have one delivered to your inventory.
-
Right-click the HUD and select Wear. The HUD will attach to the Center HUD slot by default. If you want to change this, right-click the HUD in your inventory and select Attach to HUD (rather than Wear) and then select your desired HUD slot.
-
By default, the Tools face appears when you first attach the HUD. Click the Backdrop or Tools buttons at the top of the HUD to switch between the Backdrop or Tools faces. Click the PhotoSpin logo at the top of the HUD to hide either face.
-
If necessary, you can adjust the position of the HUD on your screen. By default, the HUD appears towards the left-hand side of the screen, but you can change this. Right-click any solid area of the HUD (for example, the PhotoSpin logo) and select Edit from the pie menu. Use the green and blue arrows to move the HUD to your preferred spot on screen. If you can’t see the HUD, rotate the mouse wheel towards you while in Edit mode to display off-screen objects.
-
To detach the HUD, right-click on a solid area of the HUD and select Detach. Alternatively, you can locate the HUD in your inventory, right-click it and select Detach.
Note: you need to be within 50 meters of the Control Sphere to use the HUD. Beyond this distance, the HUD will not communicate with PhotoSpin.
Important: Anyone with appropriate access permissions can have a HUD delivered to them by clicking the Control Sphere and selecting Options >> Get HUD. For instructions on how to set the access permissions for your PhotoSpin, please see the Settings section in the Setup and Menus User’s Manual.
Using the HUD
The PhotoSpin HUD provides an alternative way to control the backdrop, lights, effects and gazers. For configurations and options, you still need to use menus, but the HUD makes it easy to access the most commonly used features of PhotoSpin.
The HUD is organized into two faces: Backdrop and Tools.
The Backdrop face contains all the controls needed to operate the backdrop: Textures, Appearance, Colour, Rotate (Turn and Spin), Resize.
The Tools face contains all the controls needed to operate Lights, Effects and Gazers. Note that the Tools share the same Position and Colour panels. Accessing and using these panels is explained in the following sections.
When open, the two faces of the HUD occupy a fair amount of screen space. You can hide either face by clicking the top PhotoSpin logo panel. Click the selection buttons for Backdrop and Tools to display either face again.
Hide Sphere/Show Sphere
Use the two round buttons on the PhotoSpin logo panel to hide or show the Control Sphere.
Use the grey button to make the Control Sphere invisible, and the red button to make it visible. This feature allows you to position the Control Sphere conveniently for ease of access while setting up your shots. You can then make it invisible when it’s time to start shooting.
Backdrop
Click the Backdrop selection button immediately below the PhotoSpin logo to display the Backdrop controls. These are arranged in four panels, which roughly correspond to the Backdrop menus: Texture/Appearance, Colour, Rotate (Turn and Spin), and Resize.
Backdrop: Texture/Appearance
Use the arrow buttons to cycle through the textures in the backdrop. You can move forward or backwards in steps of 1, 5 or 20.
Use the No Texture button (grey rectangle) to remove textures from the backdrop.
Use the T buttons to adjust the texture tile factor. Click the minus and plus icons to decrease or increase this value.
To adjust brightness, use the Full (yellow “sun”) and Normal (yellow circle) buttons.
To adjust the glow intensity, use the G buttons . Click the minus and plus icons to decrease or increase this value.
Backdrop: Colour
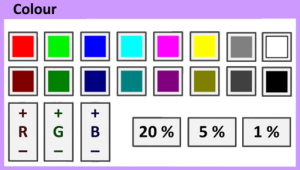
You can change the colour of the Backdrop using predefined Colour buttons, or by selecting Custom Colours using RGB values.
Click one of the predefined Colour buttons to place that colour on the Backdrop. The available options are: (top row, from left to right) Red, Green, Blue, Cyan, Magenta, Yellow, Grey, White; (bottom row) Dark Red, Dark Green, Dark Blue, Dark Cyan, Dark Magenta, Dark Yellow, Dark Grey and Black.
To create Custom Colours by adjusting the RGB (red, green, blue) values:
- Click one of the percentage buttons (20%, 5% and 1%) to select the specific amount that a colour will change.
- Click the minus and plus icons on the RGB buttons to decrease or increase the RGB values by the selected amount.
- The colour changes will appear on the Backdrop as you adjust the RGB values.
Note: the 20%, 5% and 1% percentages correspond to 0.2, 0.05 and 0.01 colour units, respectively.
Backdrop: Rotate
Use the Rotate panel to Turn the Backdrop by degree steps, or Spin it continuously, around any of the XYZ axes. You can also use it to Pin the backdrop to a desired alignment.
To Turn the Backdrop by degree steps:
- Click Turn.
- Click the number of degrees you want the Backdrop to turn: 5, 30, or 90 degrees.
- Click the XYZ plus or minus buttons to turn the Backdrop around the respective XYZ axes.
To Spin the Backdrop continuously:
- Click Spin.
- Click the speed at which you want to spin the Backdrop: Slow, Medium, or Fast.
- Click the XYZ plus or minus buttons to spin the Backdrop around the respective XYZ axes.
- Click the red Stop button to stop the spin.
To Pin the Backdrop to a desired alignment:
- Turn or Spin the Backdrop to the desired alignment.
- Click Pin.
- PhotoSpin will now use this setting as the base alignment for the Backdrop.
To Zero the Backdrop:
- Click the Zero button to return the Backdrop to the pinned (base) alignment.
Note: In the menus, when you Turn the Backdrop, and then Spin it, PhotoSpin temporarily retains this final Turn positon as the point from which all subsequent Spin rotations occur. This step is bypassed on the HUD, so that the Backdrop simply returns to the pinned (base) alignment when you click the Zero button.
Backdrop: Resize
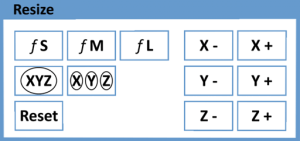
The Resize panel allows you to change the dimensions of the Backdrop to virtually any size you want within the 10 meter limit on prim size set by Second Life.
To Resize the Backdrop:
- Click one of the size factor buttons (fS, fM, fL) to select the amount the backdrop will resize.
- Use the XYZ + or – buttons to increase or decrease the size of the backdrop.
- Click Join (XYZ all circled) to resize along all three XYZ coordinates at the same time.
- Click Unjoin (XYZ circled separately) to resize along each of the XYZ coordinates independently.
- Use the Reset button to restore the backdrop to the default size.
Notes: The size factor ratios are as follows: fS = 1.1, fM =1.414214, fL = 1.732051. Textures will realign automatically as you resize the Backdrop.
Tools
Click the Tools selection button immediately below the PhotoSpin logo to display the Tools controls. These are arranged in five panels, which roughly correspond to all the menus for Lights, Effects and Gazers.
The Lights, Effects and Gazer controls on the HUD share the Position and Colour panels. When you click a specific light, effect or gazer, the Position or Colour controls will be assigned to the selected item.
Tools: Lights
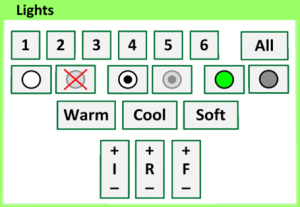
The Lights panel allows you to operate all the lights for PhotoSpin conveniently.
To rez and operate a light:
- Click one of the number buttons (1 to 6) first to select a light.
- Click the Create button (white circle) to rez the selected light inworld.
- Use the Delete button (grey circle covered by a red “x”) to delete the selected light.
- Use the Show button (white circle with black dot inside) to make the selected light visible.
- Use the Hide button (grey circle with grey dot inside) to make the selected light invisible.
- Use the On button (bright green circle) and Off button (dark grey circle) to switch the selected light on or off.
To change the Colour of a selected light:
- Select a light on the Lights panel. The light number will appear on the Colour panel.
- Use the Colour panel to select a predefined colour or compose a custom one (see Tools: Colour below).
- Use the Warm, Cool and Soft buttons on the Light panel to quickly apply these commonly used colours to the selected light.
To change the Position of a selected light:
- Select a light on the Lights panel. The light number will appear on the Position panel.
- Use the Position panel to move the slected light to the position desired (see Tools: Position below).
To adjust the light’s Intensity, Radius and Falloff parameters:
- Click the minus and plus icons on the I, R and F buttons to decrease or increase these values (I=Intensity; R=Radius; F=Falloff).
Note: You can use the All button to operate on all lights at the same time. Please note that some operations cannot be done on all lights, and you will have to target them one by one.
Tools: Effects
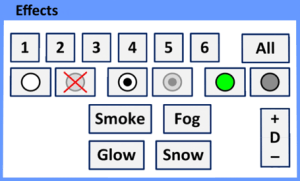
The Effects panel allows you to operate all the effects for PhotoSpin conveniently.
To rez and operate an effects generator:
- Click one of the number buttons (1 to 6) first to select an effects generator.
- Click the Create button (white circle) to rez the selected generator inworld.
- Click the Smoke, Fog, Glow or Snow buttons to select the type of effect desired.
- Use the Delete button (grey circle covered by a red “x”) to delete the selected generator.
- Use the Show button (white circle with black dot inside) to make the selected generator visible.
- Use the Hide button (grey circle with grey dot inside) to make the selected generator invisible.
- Use the On button (bright green circle) and Off button (dark grey circle) to switch the selected generator on or off.
To change the Colour of a selected effect:
- Select an effects generator on the Effects panel. The effects generator number will appear on the Colours panel.
- Use the Colour panel (bottom of the HUD) to select a predefined colour or compose a custom one (see Tools: Colour below).
Note: not all effect types support colour changing; for example, snow is always white.
To change the Position of a selected effect generator:
- Select an effects generator on the Effects panel. The effects generator number will appear on the Position panel.
- Use the Position panel to move the slected generator to the position desired (see Tools: Position below).
To adjust the Density of the effect:
- Click the minus and plus icons on the D button to decrease or increase this value.
Note: You can use the All button to operate on all effect generators at the same time. Please note that some operations cannot be done on all the effects, and you will have to target them one by one.
Tools: Gazers
The Gazer panel allows you to operate all the gazers for PhotoSpin conveniently.
To rez and operate a gazer:
- Click one of the number buttons (1 to 6) first to select a gazer.
- Click the Create button (white circle) to rez the selected gazer inworld.
- Use the Delete button (grey circle covered by a red “x”) to delete the selected gazer.
- Use the Show button (white circle with black dot inside) to make the selected gazer visible.
- Use the Hide button (grey circle with grey dot inside) to make the selected gazer invisible.
- Use the On button (bright green circle) and Off button (dark grey circle) to switch the selected gazer on or off.
To change the Position of a selected gazer:
- Select a gazer on the Gazers panel. The gazer number will appear on the Position panel.
- Use the Position panel to move the slected gazer to the position desired (see Tools: Position below).
Note: You can use the All button to operate on all gazers at the same time. Please note that some operations cannot be done on all gazers, and you will have to target them one by one.
Tools: Position
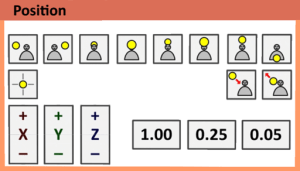
The Position panel works on the currently selected light, effect generator or gazer, as shown on the panel’s title bar. For example, if you click the button 1 in the Lights panel, the text “Light 1” will appear on the Position panel’s title bar. If no element (light, effect generator or gazer) is selected, the Position panel remains idle.
To move a selected element (light, effect or gazer) around the avatar nearest to the PhotoSpin Control Sphere, use the Intelligent Position buttons. These buttons show a grey human torso plus a yellow circle, indicating how the element is positioned when you click the button. The available options are, from left to right and top to bottom: Right, Left, Back, Front, Back Up, Front Up, Above, Feet, Centre, Closer and Further.
You can also move a selected element (light, effect or gazer) using the XYZ coordinates:
- Select the distance the selected element will move by clicking one of the distance buttons: 1.00, 0.25 or 0.05, which correspond to 1 meter, 25 cm and 5 cm, respectively.
- Click the minus and plus icons on the X, Y or Z buttons to decrease or increase the element’s X, Y or Z coordinates.
Tools: Colour
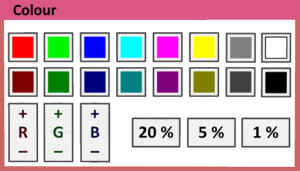
The Colour panel works on the currently selected light or effect, as shown on the panel’s title bar. For example, if you click the button 1 in the Lights panel, the text “Light 1” will appear on the Colour panel’s title bar. If no element (light or effect) is selected, the Colour panel remains idle.
Once you have selected an element, use the predefined colour buttons to set its colour. The available options are: (top row, from left to right) Red, Green, Blue, Cyan, Magenta, Yellow, Grey, White; (bottom row) Dark Red, Dark Green, Dark Blue, Dark Cyan, Dark Magenta, Dark Yellow, Dark Grey and Black.
To create Custom Colours by adjusting the RGB (red, green, blue) values:
- Click one of the percentage buttons (20%, 5% and 1%) to select the specific amount that a colour will change.
- Click the minus and plus icons on the RGB buttons to decrease or increase the RGB values by the selected amount.
- The colour changes will apply to the selected light or effect as you adjust the RGB values.
Note: the 20%, 5% and 1% percentages correspond to 0.2, 0.05 and 0.01 colour units, respectively.
Support
Please see the Support section in the Setup and Menus User’s Manual for information on obtaining support.
Credits
Design and Build by Serenity Mercier
Scripts by Desdemona Enfield
Original Scripts by Anna Tretiak

