Posts filed under ‘Tutorials’
Prim Light in Windlight
It’s been a while since I posted anything here. Nothing wrong. Just been extremely busy working on a major RL project. And in SL, my main focus the last several weeks has been helping with the Makeover Magic event put on by the American Cancer Society and Faces Modelling Agency, as well as writing some articles for the soon to be released revival of GLAMWorld Magazine.
Over on my fashion blog, I recently posted a tutorial on using the lighting from PhotoStage and PhotoLite to complement the effects that can be achieved using the Environment Editor in Windlight. You can see the full post here. To whet your appetite, here are a couple of “before” and “after” shots.

Photo using windlight settings only.

Photo using AMS light sources.
In the bottom photo, I used a soft front light together with a combination of cool and warm side lights from opposite directions. You can see how the additional lighting lifts the model off the backdrop and gives more definition and dimension to her face and clothing.
For the full post and credits, please click here.
Close-up on the AMS Position Editor
One of the coolest features of PhotoStage and PhotoLite is the Position Editor, which allows you to position lights, effects generators and gaze points quickly and precisely anywhere on the X Y Z axes. The editor also provides intelligent positioning which finds the model and locates the selected element in relation to her.
The Position Editor can be accessed using either menu, chat or HUD controls. For the purposes of this post, I’m showing the HUD interface since it visualizes the editor’s functions most effectively. Here’s how the Position Editor panel appears on the HUD:
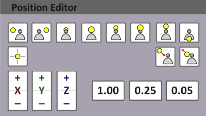
Once you’ve selected an element to move (light, effects generator or gaze point), you can use the intelligent positioning buttons to move the element around the model. The buttons showing a grey human torso plus a yellow circle indicate how the element will be positioned when you click the button. The available options are: (left to right, top row) Right, Left, Back, Front, Back Up, Front Up, Toplight, Footlight; (l to r second row) Centre, Closer and Further (these last two buttons move the selected element closer to or further from the model).
You can also use the X, Y and Z buttons to manually adjust the element’s position. Clicking the minus and plus icons will decrease or increase the element’s X, Y or Z coordinates. The distance that the element will move each time you click one of these buttons is set by the 1.00, 0.25 and 0.05 buttons, which correspond to 1 metre, 25 cm and 5 cm, respectively.
A very nifty and easy to use tool, and one of the prime reasons why PhotoStage and PhotoLite allow you to focus on what matters!
On-Location Photography
Second Life offers an abundance of amazing locations for great shoots. Yet optimizing the lighting for an on-location shoot can be challenging, which is one reason why many SL photographers opt for studio shooting. I recently took Ananke Media Systems‘ PhotoLite toolkit to the beach to see how this highly versatile system can enhance the look of images you capture inworld.
This first photo shows our lovely model (none other than moi – of course!) posing on the beach with the existing night lighting. Nice location – what you can see of it!

Here’s the same location with lighting and effects added from the PhotoLite toolkit. I’ve used lights to brighten certain elements in the background (the pampas grass and palms) as well as the model (isn’t she gorgeous? — okay, I’ll stop). I’ve also added a very light mist with two effects generators to soften the reflected light from the sand and provide another colour detail.

After hiding all the lights, effect generators and the pose stand with a couple of quick clicks on the PhotoLite HUD or menus, the scene becomes a vivid yet still natural looking setting perfect for capturing the romance of LeeZu Baxter’s Noir line!

Moving in for a closer view, I made some minor adjustments in the positioning of the lights using the PhotoLite HUD – all without ever changing the camera frame! One of the beauties of AMS products is the ability to stay focussed on the specific camera angle you want while using the HUD, menu or chat controls to adjust lighting, effects and even the direction the model’s eyes are looking. (Click “More” to see the photo.) (more…)
Tutorial: Updating your PhotoStage or PhotoLite
In this tutorial I explain how to update your PhotoStage or PhotoLite. Owners of these products are entitled to lifetime updates, which basically means that once you buy from us, you will receive any future version of the same product for free, forever.
Having the latest version of your product is important, since we often introduce fixes for all those Second Life glitches and performance improvements, as well as new features. Also, we usually do not support products that are not up to date.
If you want to stay up to date, the first thing you need to think about is how to find out whether a new version has been released. There are basically two channels that we use to publicise updates: this web site and the Ananke Media Systems User Group. We suggest that you join this group to receive notifications about new releases and the occasional exclusive gift.
An alternative way to find out whether an update has been released is to make your product check for updates. I explain how to do this in the next section.
Watch the video!
The awesome video that Serenity Mercier created for the PhotoStage Launch Event is now available from the PhotoStage page, and also at the AMS Demo Site in Lady Vale.
Don’t miss it!
Tutorial: Lights and effects basics
In this second tutorials post I explain the basics of lights and effects. This is valid for PhotoStage and PhotoLite as well.
First, some definitions. A light is just an object that emits light. You can have up to six of them with either PhotoStage or PhotoLite. Lights allow you to illuminate your subject using what SL calls “local lighting”, i.e. light cast by prims with the light flag active, as opposed to “environment light” which comes from the sun and moon. As you surely know, light is the essence of a photograph, so a fine control of lights is crucial to achieve great results.
Tutorial: Using the PhotoStage backdrop
A few PhotoStage users have suggested that a post series containing short tutorials explaining how to use PhotoStage would be good. I think that’s a great idea, so here I am starting. Most of the material that I will go through can be found in the User’s Manual, so don’t forget that this is a good source of information.
I assume that you know how to touch the control box to obtain the main menu. The control box is that orange cube that comes with the PhotoStage, and which often sits next to the backdrop.
Today I will examine the PhotoStage backdrop, that large curved surface against which you often photograph your model. When you rez (or reset) your PhotoStage, the backdrop is plain grey. You can change three things about it: colour, texture and brightness, which are, precisely, the three options that you see if you click the Backdrop button on the main menu.
